- Supplies that you will need include, 100% raw wool (called wool silver or fleece), sushi mat or bamboo blinds, spray bottle or watering can, and soap.

- Lay out any desired pattern for the finished felt on the bamboo mat, using wool or other feltable fibres.
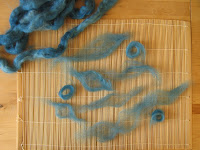
- Once you have a design you like, cover it with several layers of wool in your base colour or colours. Your layers should cross each other in opposing directions to encourage the felting process.

- Move your bamboo mat and wool to a sink or bathtub. Fill your spray bottle or watering can with slightly soapy water. Wet the wool with the soapy water.

- Roll up the wet wool in the bamboo mat. To keep the bamboo roll secure you can place an elastic band around the outside. Applying pressure, roll the bamboo "package" along the bottom of your sink about 30 times. Unroll the package, and roll it back up from the opposite end of the bamboo mat. Press and roll the bamboo another 30 times.
- Unroll the bamboo. You should now have a "pre-felt" which is strong enough to pick up as one piece. Turn the pre-felt over and repeat the process of rolling, changing direction, and flipping. Wet the felt with more soapy water if needed, alternating between hot and cold water, to speed up the felting process. You will know that the felt is strong enough to stop the rolling process, once you can pinch the surface of the felt and not grab individual fibers. The finished felt will have shrunk considerably from the size you originally laid out.

- Remove your newly made felt from the bamboo roll and place on a flat, shaded, surface to dry. Since wool has a "memory", and will remain in the shape that it is dried in until whetted again, you do not want to hang the felt to dry over a line or pinned to anything. Once the felt is dry it can be cut or sewn into anything you want.

Showing posts with label felt. Show all posts
Showing posts with label felt. Show all posts
10.2.08
I felt that!
This is my first attempt at creating felt at home, along with instructions on how I did it.


1.2.08
iPod Cozies
These iPod cases are really simple to put together and cost pennies to make. For a pocket or sleeve style cozy: cut a piece of felt that is the size of 2 iPods, lengthwise, and one iPod wide plus a little extra felt for the seem. Stitch some felt cutouts onto what will become the front of the case, fold the felt in half and stitch the sides together using a basic blanket stitch.
I've made a couple variations with fabric lining, button closures, multiple layers for pockets, and a hole on the bottom to allow for easy iPod charging. I made the more complicated Owl case by creating a template from a preexisting case. The best part about the cozies is that the felt is so soft, it wont scratch your iPod at all.

I've made a couple variations with fabric lining, button closures, multiple layers for pockets, and a hole on the bottom to allow for easy iPod charging. I made the more complicated Owl case by creating a template from a preexisting case. The best part about the cozies is that the felt is so soft, it wont scratch your iPod at all.

Subscribe to:
Posts (Atom)
